CI/CD: Branching, Git Flow, and Pull Requests
📚 Series: CI/CD and AI: From Theory to Practice
Before the CI/CD pipeline is triggered, code must go through a structured process of branching, review, and approval. This article describes how professional teams organize that process, which GitFlow models exist, how AI enhances the developer workflow, and what happens during a Pull Request.
Table of Contents
Branching Strategy
Description
A software project is divided into main branches and support branches:
- Main branches (infinite lifetime): these are
mainanddevelop. These branches exist for the entire life of the project. - Support branches (temporary): all others (
feature/,release/,hotfix/, etc.). Unlike the main ones, these have a limited lifetime (they are created for a specific purpose and deleted when finished). They are usually represented with a trailing/, because after the keyword (such asfeature) you typically add an identifier or descriptive title (for example:feature/idTitle).
Most importantly, the main branch is always the master branch (the principal one) — not only do all other branches originate from and merge back into it, but the code there is the definitive version that, after CD (Continuous Delivery/Deployment), will be deployed to production.
When the develop branch or another more advanced branch becomes stable, the usual practice is to first merge it (or open a PR) into a branch called release (to separate what will be pushed as a new version to production from day-to-day work), and finally the responsible person would merge (or PR) it into main.
Main and support branches
The following table shows a complete overview of the most common branch types:
| Branch | Origin | Destination | CI/CD usage (Triggers) | Purpose / When to use it |
|---|---|---|---|---|
main (or master) |
release / hotfix |
– | Deploy Prod: Automatic deployment to production and Tagging. | Official, stable code in use by customers. |
develop |
main |
– | Deploy Staging: Deploy to the testing and integration environment. | The current state of development for the next release. |
feature/ |
develop |
develop |
Test & Lint: Run unit tests and code quality checks. | New feature development (Jira tickets). |
release/ |
develop |
main and develop |
Pre-prod Check: Regression tests and version close-out. | Final preparation. Only minor fixes are allowed. |
hotfix/ |
main |
main and develop |
Emergency Pipeline: Urgent deployment of patches. | Critical production errors that must be fixed NOW. |
fix/ (or bugfix/) |
develop |
develop |
Bug Validation: QA verification in the development cycle. | Errors found in develop that are not in production. |
refactor/ |
develop |
develop |
Performance Audit: Review for no technical degradation. | Improve existing code without changing its functionality. |
chore/ |
develop |
develop |
Dependency Check: Vulnerability scan on libraries. | Maintenance (update npm, linters, build configs). |
docs/ |
develop |
develop |
Docs Deploy: Update the static documentation portal. | Changes exclusively to README, Wiki, or API comments. |
Note on the difference between “fixes”:
fix/(orbugfix/) is an error in development andhotfix/is an error in production; the former is an error that can be calmly fixed in development, while the latter is an error to fix urgently in production (with its high associated risk).
Most modern teams use a system that directly links code with the project management tool (such as Jira, Linear, or Azure DevOps). At a professional level, a branch is not just called my-branch, but something that the rest of the team can identify. Furthermore, the name triggers automatic processes, such as automatic linking of a Jira ticket to that branch.
The typical structure is: type/PROJ-123-brief-description
- Type: defines the nature of the change (see table above).
- Ticket ID: the exact task code in Jira (e.g.,
PROJ-123orFRONT-42). - Description: 2–4 words in kebab-case (hyphen-separated) that summarize the change.
A complete branch name example: feature/DATA-505-new-feature
For Jira the ID is important because:
- Including the ticket ID (e.g.,
DATA-505) in the branch name enables automatic triggers. - In Jira the ticket automatically changes from “To Do” to “In Progress” when you create the branch.
- In the Pull Request a direct link is generated between the task and the code, making the reviewer’s job easier.
- Traceability: if there is an error a year from now, you can see which business ticket originated that code change.
Branch naming examples:
| Branch | Owner / Who uses it | Contents |
|---|---|---|
| feature/id-name | A developer | Work in progress on a Jira ticket. |
| develop | The whole team | The sum of all completed tasks (Beta). |
| release/v1.2.3 | DevOps / Tech Lead | Code ready for production, in the polishing phase. |
| main | Customer / User | Stable, running code (Production). |
Difference between Pull Request and Merge
Pull Request (PR) — “The change proposal”:
A Pull Request (PR) is a feature offered by some platforms such as GitHub, Bitbucket, or Azure DevOps; it is not a Git command. It is a review and discussion process so that other developers can review your code before it is integrated.
- Purpose: it is an invitation for other developers to review your code before it is integrated. It also triggers tests (often unit tests as part of CI).
- Content: shows the differences (diffs) between the
feature/ID-examplebranch anddevelop, allows inline comments on specific lines, and runs automated checks (CI/CD). - State: a PR can be “Open” (under review), “Closed” (rejected), or “Merged” (accepted).
Merge — “The action”:
A Merge is the technical Git operation that combines the history of two branches. It is the final step that happens after the Pull Request has been approved.
- Purpose: unify the timelines. All commits made in
feature/ID-examplebecome part of the history of the target branch (such asdevelop). - Mechanics: can be done via the command line (
git merge feature/...) or by clicking the “Merge” button on the platform once the PR is approved.
Note on
Merge: The Merge is the technical operation that unifies timelines. All commits made in the feature branch are integrated into the history of the target branch (such as develop).
Merge types when closing a PR:
- Merge Commit: keeps the full commit history of the feature.
- Squash and Merge: compresses all your commits into one (leaves the
develophistory cleaner). Squash and Merge is very popular in large teams because it preventsdevelop’s history from filling up with hundreds of small commit messages (likefix typoorremoving console.log), leaving only one clean commit per Jira task. - Rebase and Merge: applies your changes one by one on top of
develop’s base without creating a merge commit.
Complete professional workflow
The complete professional workflow is typically:
- Local: you work on your
feature/PROJ-123-new-apibranch. - Push: you push the branch to the server.
- PR: you create the Pull Request from your branch to
develop. - Review: your teammates review the code. If there are errors, you push more commits to the same branch and the PR updates automatically.
- Merge: once you have the "Approve"s, the Merge is executed. Your
featurebranch can now be deleted because its code now lives in thedevelopbranch. - Staging and Integration (on develop): the code is automatically deployed to a Staging (or testing) environment. QA (Quality Assurance) analysts or the product owner test your Jira task in a real environment alongside the changes from the rest of the team.
- Creating the
releasebranch: when the team decides there are enough completed tasks indevelopfor a new version (example:v1.5.0), a branch calledrelease/v1.5.0is created fromdevelop. Code Freeze: in this branch no new features are accepted, and only critical bug fixes discovered during final testing are allowed. - Production preparation: for a few days (the length of the release cycle), the
releasebranch lives independently. If a last-minute bug is found, it is fixed (Hotfixes) directly onrelease/v1.5.0. These fixes are also typically sent back todevelopvia a PR so the development team has them (Synchronization). - Double Final Merge: when the
releasebranch is declared stable, the official deployment happens: a Pull Request is opened (for our example:release/v1.5.0) towardmain. When approved and merged, CI/CD triggers deployment to the Production environment. A “Tag” is then created in Git (e.g.,v1.5.0) on that commit onmain— this serves as a permanent “snapshot” of what is in production at that moment. Finally, a merge todevelopis done, ensuringdevelopis up to date with any changes made on thereleasebranch. - Jira cycle close: after a successful deployment, a mass update is performed where all Jira tickets included in that version (such as your
PROJ-123) automatically move to the Done/Released state. This is followed by cleanup where therelease/v1.5.0branch is deleted from the server, since its history now lives inmainand in the Tag.
Note on the “Tag”: This Tag works as a permanent ‘snapshot’. If the deployment fails, the team can use that Tag to identify exactly which stable version must be restored immediately.
Diagram

Git Flow Models
Description
There are two main models for running CI/CD in relation to when the Pull Request is merged: the classic model (where CI/CD runs after the merge) and the modern model (where CI/CD runs before the merge).
Classic model: CI/CD runs AFTER the PR merge
This used to be the traditional way of working (and is the simplest option if you do not want complications), where everything was waited to be on the main branch and then CI/CD was launched.
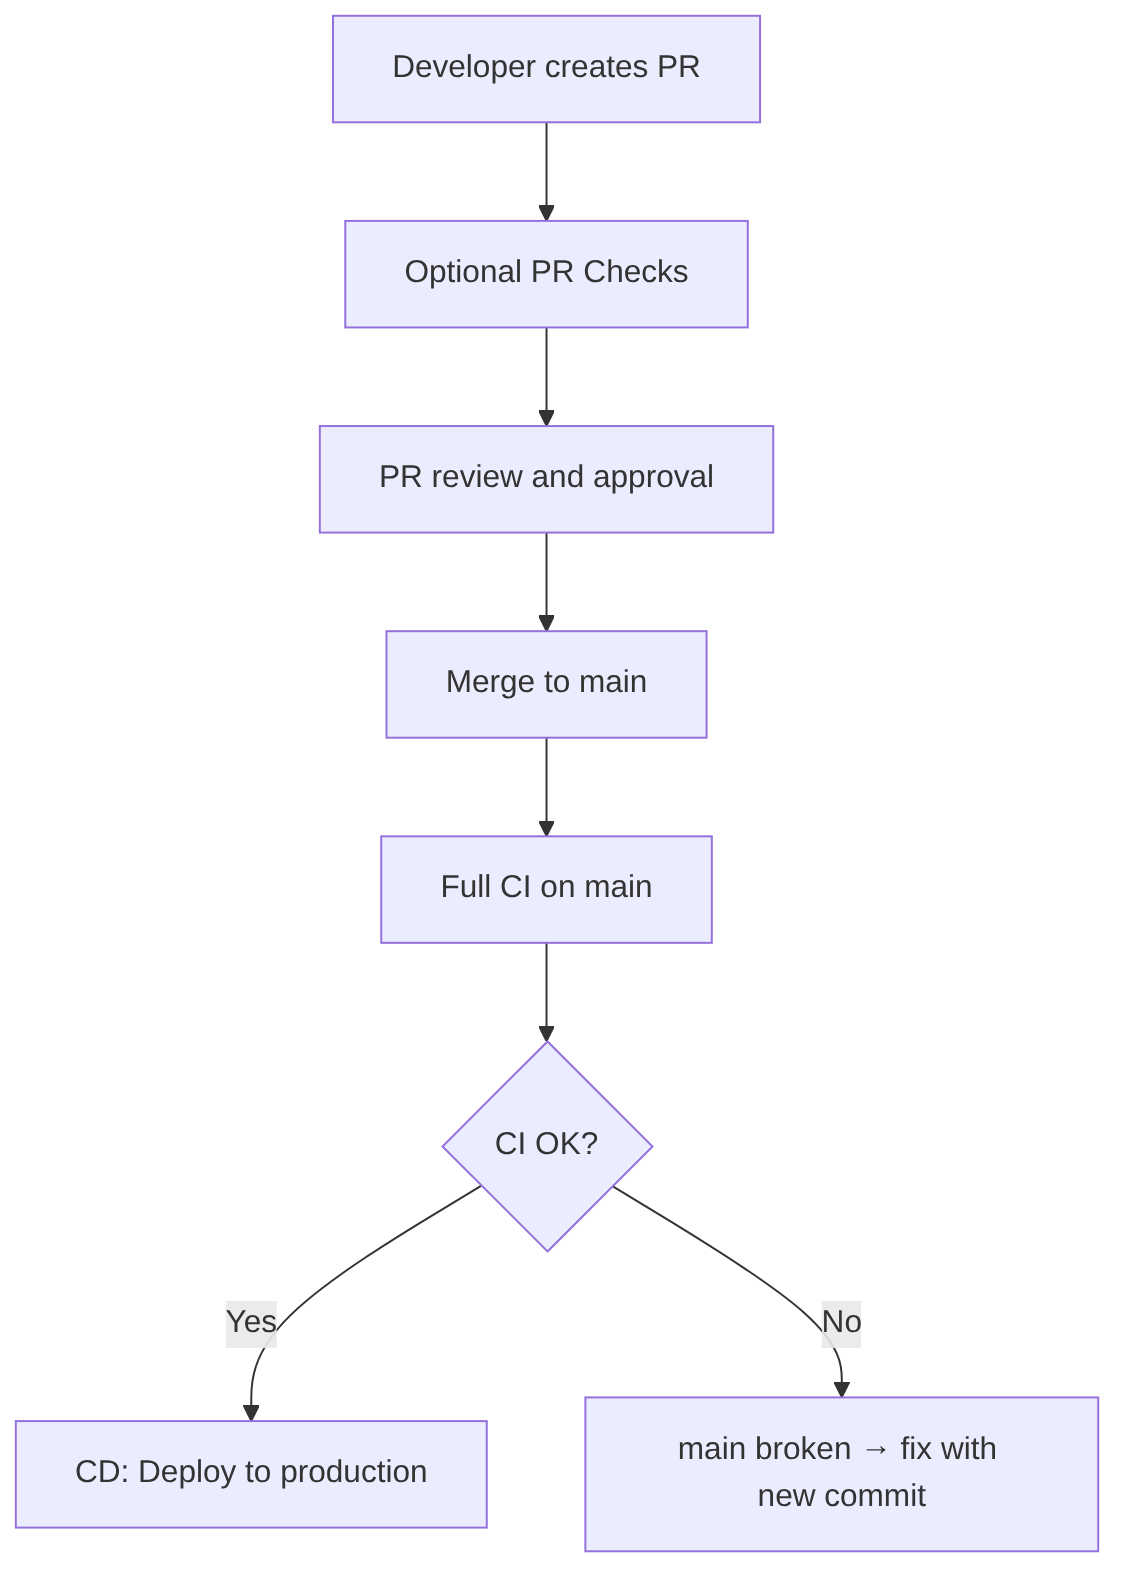
This is the traditional model:
- The developer opens a PR → PR Checks run
- The PR is reviewed and approved
- The PR is merged to main
- The merge triggers the full CI/CD pipeline
- If CI/CD passes → code reaches production
- If CI/CD fails → the merge is already done, but it must be fixed on
main
Advantage: simple and traditional.
Disadvantage: if CI/CD fails, main is broken. This is why this model is falling out of use in mature companies.
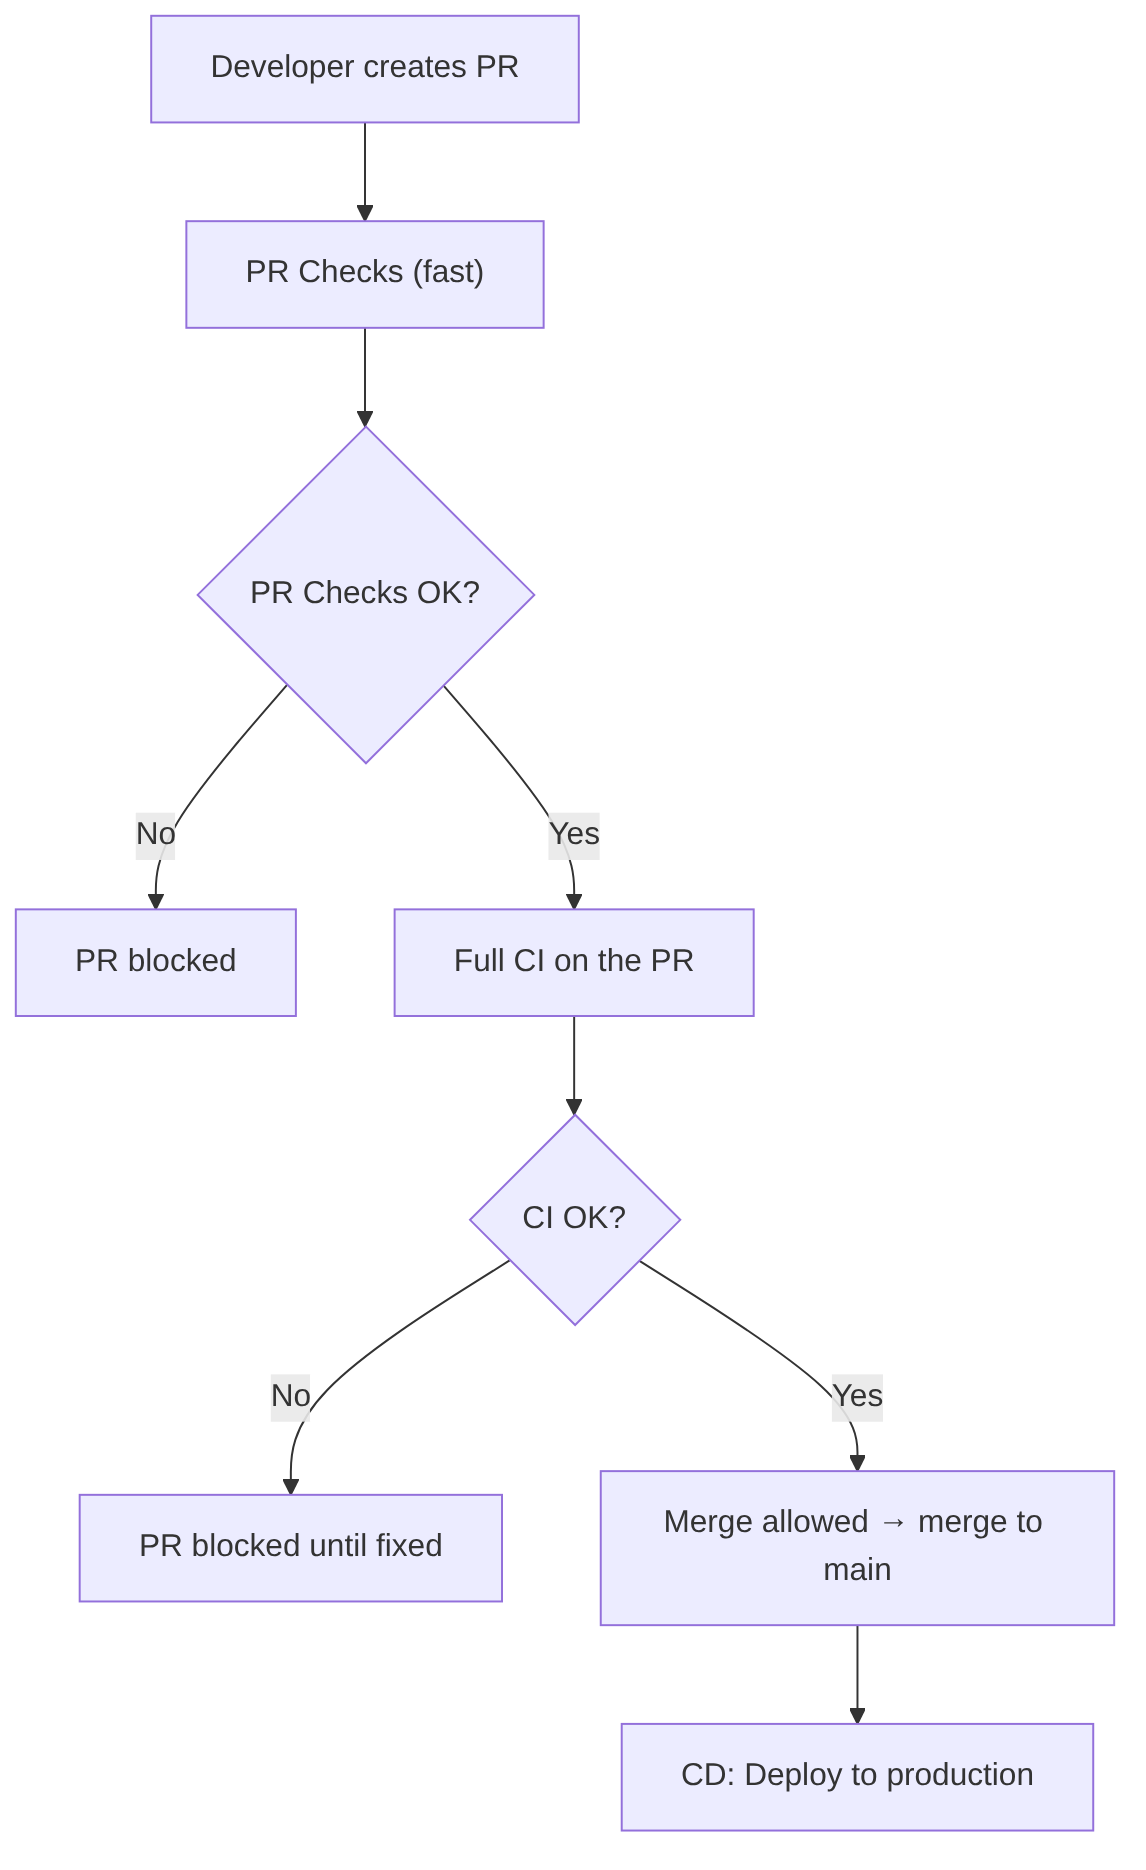
Modern model: CI/CD runs BEFORE the PR merge (recommended)
In a modern GitFlow, PR Checks and CI should run on all merges toward develop, release, and main.
CD only runs on main.
This guarantees that no branch ever breaks and that merges are always protected by CI.
The guiding principle is: no branch should ever break.
This is the model used by:
- GitHub (with Required Checks)
- GitLab (with Merge Trains)
- Azure DevOps (with Branch Policies)
- Bitbucket (with Merge Checks)
Real flow:
- The developer opens a PR
- PR Checks (fast) run
- If they pass → full CI runs on the PR
- If CI passes → the PR is marked as “mergeable”
- The merge is only allowed if CI has passed
- The merge does NOT re-trigger CI (or only CD, depending on configuration)
Advantage: branches never break, because CI runs BEFORE the merge.
Recommended pipeline structure for each branch:
- Mandatory, fast PR Checks before CI
- Mandatory full CI before the merge (merge is blocked if it fails)
- CD after the
mainmerge (or in merge trains)
Should PR Checks and CI run on ALL merges or only on main?
The recommendation is to run it on all branches so none break, because if you only run CI on main:
developcan breakreleasecan breakhotfixbranches can break- merges become unpredictable
- quality is no longer guaranteed
That said, if running on all branches is too much, the minimum is to protect the main, develop, and release branches.
Why should CI run BEFORE the merge into develop and release? Because if not:
developbreaks and blocks the entire teamreleasebreaks and blocks QA and UAT (User Acceptance Testing)mainbecomes unpredictable- If
developis broken, you cannot create arelease - If
releaseis broken, you cannot deploy
This way, on ALL merges to develop, release, and main:
- PR Checks (fast)
- Full CI (tests, quality, SAST, SCA, etc.)
And only main runs:
- CD (deploy)
Branch protection
| Branch | PR Checks | Full CI | Merge blocked if fails | CD | Purpose |
|---|---|---|---|---|---|
| feature → develop | ✔ Yes | ✔ Yes | ✔ Yes | ❌ No | Continuous integration without breaking develop |
| develop → release | ✔ Yes | ✔ Yes | ✔ Yes | ❌ No | Prepare stable versions for QA/UAT |
| hotfix → release | ✔ Yes | ✔ Yes | ✔ Yes | ❌ No | Fix release without breaking it |
| release → main | ✔ Yes | ✔ Yes | ✔ Yes | ✔ Yes (after merge) | Publish stable version |
| hotfix → main | ✔ Yes | ✔ Yes | ✔ Yes | ✔ Yes (after merge) | Urgent production deploy |
What runs on each branch:

Example of what happens with the branches (develop, release, main):
CI runs on the PR branch:
- PR from
feature/xxx→ towarddevelop - CI runs on the feature branch
- If CI approves → merge to
developis allowed
After the merge, another CI/CD is triggered on the destination branch:
- Merge to
develop→ triggers CI/CD ondevelop - Merge to
release/x.y→ triggers CI/CD on release - Merge to
main→ triggers production CI/CD
Multi-model support
If the pipeline is implemented correctly, it will support at least these three corporate models:
-
Trunk-Based:
- PR → CI
- Merge to
main - CD → production
-
GitFlow:
- PR → CI
- Merge to
develop - CD → Dev/Staging
- Release branch → CD → Preprod
- Merge to
main→ CD → Production
-
Corporate Release Branches:
- PR → CI
- Merge to
release/x.y - CD → regulated environments
- Merge to
main→ production
Modern developer workflow with AI
Description
This section collects ideas on how to work with AI in the workflow of a developer who uses AI intensively. There is no perfect strategy and it is constantly evolving; what is presented here is a starting point to capture ideas. Some will apply in certain cases and not others, with greater or lesser intensity, depending on the need and the developer’s comfort level.
Diagram

Detail of each step
1) Project Start: Intelligent Environment Setup
-
1.1. AI-driven project initialization:
- generates the initial structure (folders, modules, configuration).
- proposes team standards (naming, architecture, linters).
- creates base files (
README,CONTRIBUTING,docker-compose,.editorconfig). - configures initial CI/CD (GitHub Actions, GitLab CI, Azure Pipelines…).
- generates initial domain documentation.
-
1.2. Download of corporate prompts (ensures AI works aligned with the team’s technical culture):
- official company prompts (architecture, security, style standards).
- internal policies (naming, patterns, restrictions).
- task templates (feature, fix, refactor).
- internal skills (for example: “validate hexagonal architecture”).
-
1.3. Activation of project skills allow the AI to:
- understand the business domain.
- know the internal rules.
- access internal documentation.
- apply project-specific patterns.
Example:
“Skill: Validate that any new endpoint goes through the corporate authorization module.”
2) Connection to Jira, Git, and the Repository
-
2.1. Work with tasks (e.g., from Jira) from the IDE (AI accesses Jira via MCP or corporate skills); the developer can ask:
- “Read task DATA-505 and give me a technical summary.”
- “Update the task status to In Progress.”
- “Tell me what dependencies this task has.”
-
2.2. Automatic branch creation with AI and automatic task (Jira) update.
-
2.3. Remote repository reading, where the AI can:
- read branches.
- compare diffs.
- analyze commits.
- review history.
- detect critical points.
3) Development with AI: Agents, MCP, and Automation
-
3.1. AI agents in the IDE (Multi-Agent Coding Systems). The IDE runs several agents simultaneously:
- generates complete implementations.
- proposes refactors.
- detects logical errors.
- suggests design patterns.
- Types of agents:
- Architecture Agent: validates that the change respects the architecture (DDD, Hexagonal, CQRS), detects undue couplings, proposes module reorganization.
- Security Agent: analyzes vulnerabilities in real time, detects insecure dependencies, validates configurations (CORS, JWT, roles).
- Documentation Agent: generates docstrings, updates documentation, creates diagrams.
- Testing Agent: generates unit and integration tests, detects edge cases, proposes mocks and fixtures.
-
3.2. MCP and Multi-Context sessions, where AI understands the entire project (not just the current file):
- analyzes hundreds of files simultaneously.
- detects inconsistencies between modules.
- proposes coordinated changes.
- maintains domain memory.
Real example:
“I changed the User model. Update services, controllers, validations, and tests.”
-
3.3. Task-Driven Code Generation:
- The developer can ask:
- “Plan the implementation of task DATA-505.”
- “Give me a commit plan.”
- “Generate the service code and tests.”
- The AI generates:
- technical plan.
- subtasks.
- commit order.
- initial code.
- tests.
- documentation.
- The developer can ask:
-
3.4. Continuous Local Validation (Pre-CI), i.e., before committing the AI runs:
- static analysis.
- architecture validation.
- security review.
- missing test generation.
- code cleanup.
- performance optimization.
- technical debt detection.
4) Interaction with Jira and Git During Development
-
4.1. Automatic Jira updates, where the AI can:
- update the task status (e.g., move the task to “In Progress” or update subtasks).
- update the task with AI or developer comments (e.g., add technical comments).
- attach data (such as screenshots or logs).
-
4.2. Remote branch reading, where the developer can ask:
- “Compare this branch to develop.”
- “Tell me if there are potential conflicts.”
- “Tell me which related tasks exist.”
5) Smart Commits — Conventional Commits
The AI generates commits:
- following Conventional Commits (standard convention for commit messages).
- with reference to the Jira ticket.
- with a technical summary.
- with functional impact.
- with notes for the reviewer.
Example:
feat(DATA-505): add GET /users endpoint with validation and tests
6) PR Simulation (Pre-PR Review)
Before pushing the branch, the AI runs a simulated review (this reduces real review time):
- analyzes the diff.
- detects risks.
- suggests improvements.
- identifies confusing parts.
- generates quality checklist.
- proposes additional documentation.
- detects inconsistencies with the architecture.
- validates security.
7) PR Preparation
The AI automatically generates:
- PR title.
- technical description.
- functional impact.
- risks.
- checklist.
- notes for QA.
- links to Jira.
- diagrams if needed.
Example:
DATA-505: New users API
8) Branch Push and PR Creation
Finally, the developer does (or asks the AI to do):
git push --set-upstream origin feature/DATA-505-new-users-api
And the AI:
- creates the PR.
- links it to Jira.
- adds reviewers.
- attaches generated documentation.
- triggers CI/CD.
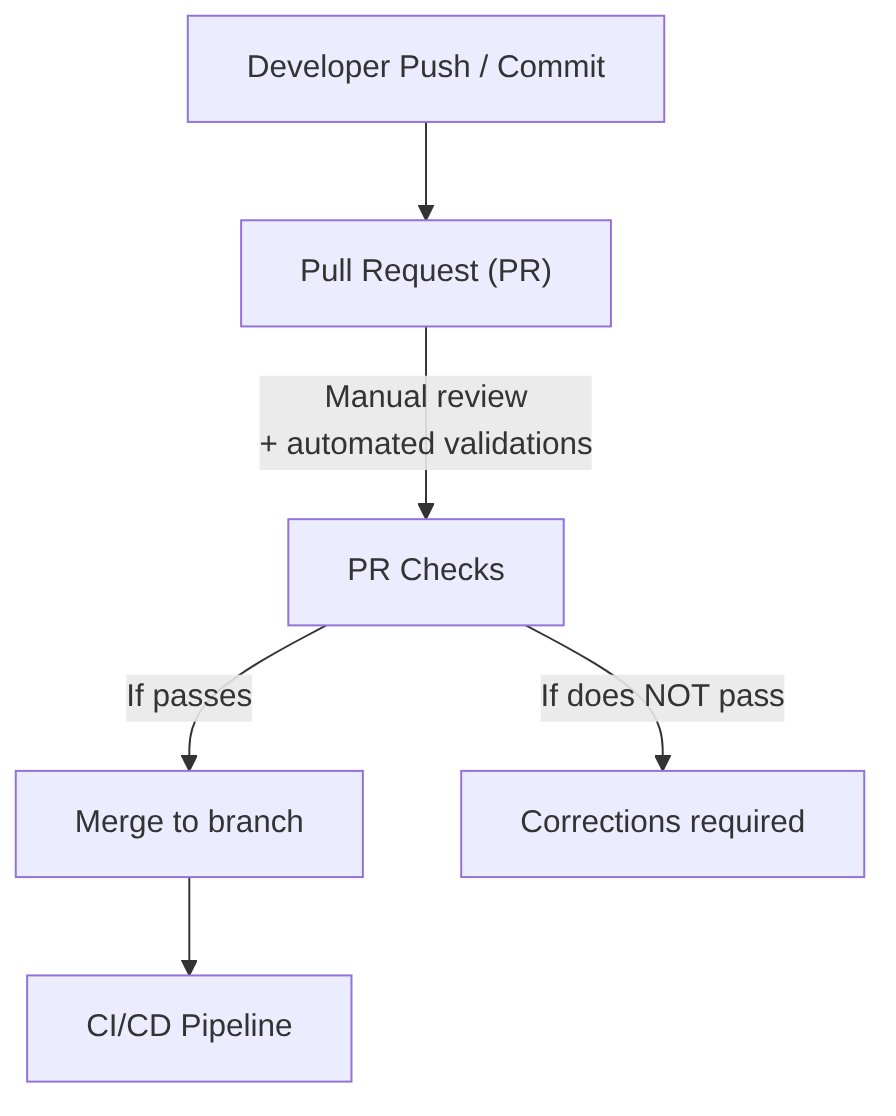
Pull Request (PR)
Description
Its goal is to ensure that the code entering the branch meets minimum standards of quality, style, security, and maintainability before activating the CI/CD pipeline.
The PR is the first quality and team collaboration filter.
Characteristics:
- It is the entry point for code into the main repository.
- It includes human review (peer review) to validate: code clarity, design, maintainability, and compliance with internal standards.
- It includes automated validations, such as: compilation, linters, formatting, lightweight static analysis, fast unit tests (optional depending on the team).
- It prevents incorrect code from reaching the CI/CD pipeline, reducing subsequent failures.
- It allows technical discussion, suggestions, and learning among developers.
- It is mandatory in most organizations, especially in regulated or high-criticality environments.
When to run it: Before the CI/CD pipeline. Passing the PR is the trigger for the CI/CD pipeline.
Human review
- Code quality.
- Readability.
- Design and architecture.
- Correct use of patterns.
- Removal of dead code.
- Unnecessary comments.
- Clear and semantic names.
- Avoid duplication.
Automated checks
(For more detail see the “PR Checks (Pre-CI)” section in the CI article.)
- Correct compilation.
- Linter (Checkstyle, ESLint, Spotless…).
- Automatic formatting.
- Fast unit tests (optional).
- Basic static analysis (without full Quality Gate).
- Dependency verification (optional).
- Security policies (secret scanning, branch protection).
AI in this phase
In advanced teams, the Pull Request is no longer just a point of human review and basic checks. It is an AI-augmented process, where intelligent agents analyze the code, detect risks, generate documentation, predict failures, and collaborate with human reviewers to ensure that the code about to be merged into the branch (usually main) is safe, maintainable, and consistent with the project architecture.
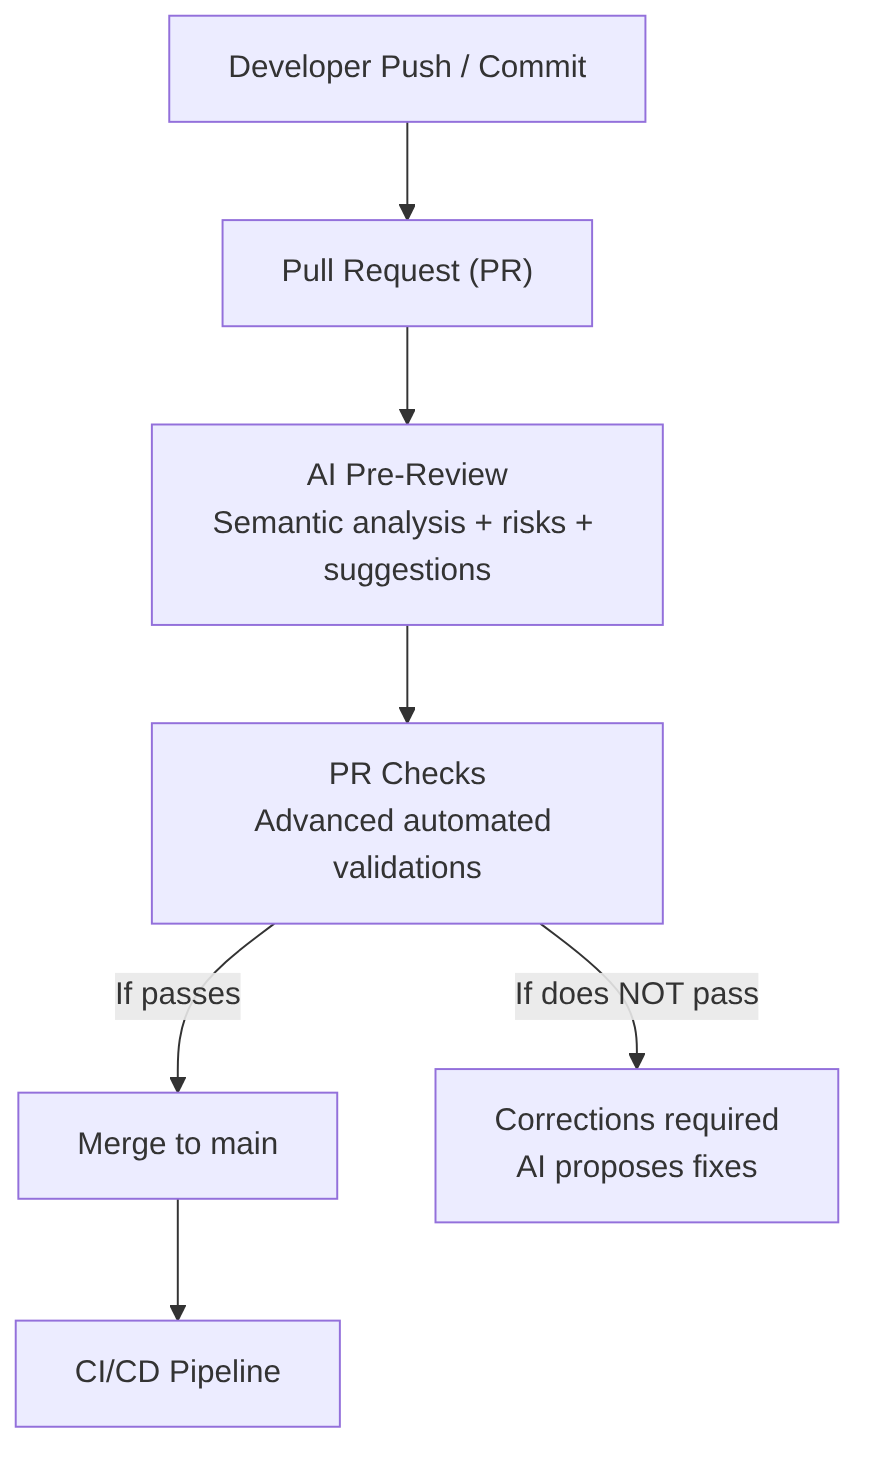
1) AI Pre-Review (before the human review)
When the PR is opened, the AI runs a preliminary review that complements and accelerates the human reviewer’s work. It performs:
-
Semantic diff analysis. The AI is not limited to syntax review:
- detects logical errors.
- identifies side effects.
- analyzes impact on related modules.
- detects inconsistencies with the architecture (DDD, hexagonal, CQRS).
-
Risk detection. The AI detects:
- duplication.
- technical debt.
- fragile points.
- pattern violations.
- unnecessary complexity.
-
Automatic suggestions. The AI proposes:
- refactors.
- simplifications.
- performance improvements.
- module reorganization.
- clearer names.
-
Automatic PR documentation generation. The AI includes:
- technical summary.
- functional impact.
- risks.
- relevant changes for QA.
- diagrams (e.g., mermaid) if needed.
2) Advanced automated checks (GitHub Actions / Jenkins / GitLab / Azure DevOps)
Modern companies no longer run only linters and fast tests; they run AI-based intelligent validations, such as:
-
Security (AI + SAST + SCA):
- OWASP vulnerability detection.
- Insecure dependency analysis.
- Secret detection (intelligent secret scanning).
- Configuration validation (CORS, JWT, roles).
- Permission and critical path analysis.
-
Intelligent testing:
- Automatic generation of missing tests.
- Detection of uncovered edge cases.
- Test fragility analysis.
- Selective test execution (test impact analysis).
-
Architecture and design:
- Architecture compliance (DDD, hexagonal, CQRS).
- Undue couplings.
- Layer violations.
- Circular dependencies.
- Incorrect patterns.
-
Documentation and traceability:
- Automatic generation of PR technical documentation.
- Diagram updates (e.g., mermaid) if needed.
- Preliminary release notes.
- Automatic links to Jira.
-
Advanced quality analysis:
- Code smell detection.
- Duplication.
- Cyclomatic complexity.
- Functions that are too long.
- Non-semantic names.
-
Corporate standards validation:
- Internal conventions.
- Security policies.
- Mandatory patterns.
- Folder structure.
- Commit conventions.
3) Interaction with the human reviewer
The AI does not replace the reviewer, but augments them, with:
-
The AI summarizes the PR for the reviewer’s decision-making and tells them:
- what has changed.
- why.
- impact.
- risks.
- affected modules.
-
The AI answers reviewer questions, such as:
“Does this change affect the payments module?” “Which tests cover this case?”
-
The AI proposes automatic fixes: if the reviewer detects a problem, the AI can generate the patch.
4) AI-assisted corrections
If checks fail (the developer just reviews and confirms the following):
- the AI explains the error.
- proposes the solution.
- generates the corrected code.
- updates tests.
- rewrites documentation if needed.
5) How this looks in a real pipeline (Examples of PR jobs/stages)
A modern pipeline includes GitHub Actions jobs like (each job runs a specialized agent that complements traditional checks):
ai-pre-reviewai-security-scanai-test-generationai-architecture-checkai-doc-generationai-pr-summary
Or stages in the Jenkins pipeline like:
pipeline {
  stages {
    stage('AI Pre-Review') { steps { aiPreReview() } }
    stage('Security Scan') { steps { aiSecurityScan() } }
    stage('Architecture Check') { steps { aiArchitectureCheck() } }
    stage('Test Generation') { steps { aiTestGeneration() } }
    stage('Quality Analysis') { steps { aiQualityCheck() } }
    stage('Documentation') { steps { aiDocGeneration() } }
  }
}
6) Benefits of the AI-augmented PR:
- Less review time.
- Fewer production errors.
- Less technical debt.
- Fewer architectural inconsistencies.
- More security.
- More traceability.
- Higher quality.
- Greater speed.
